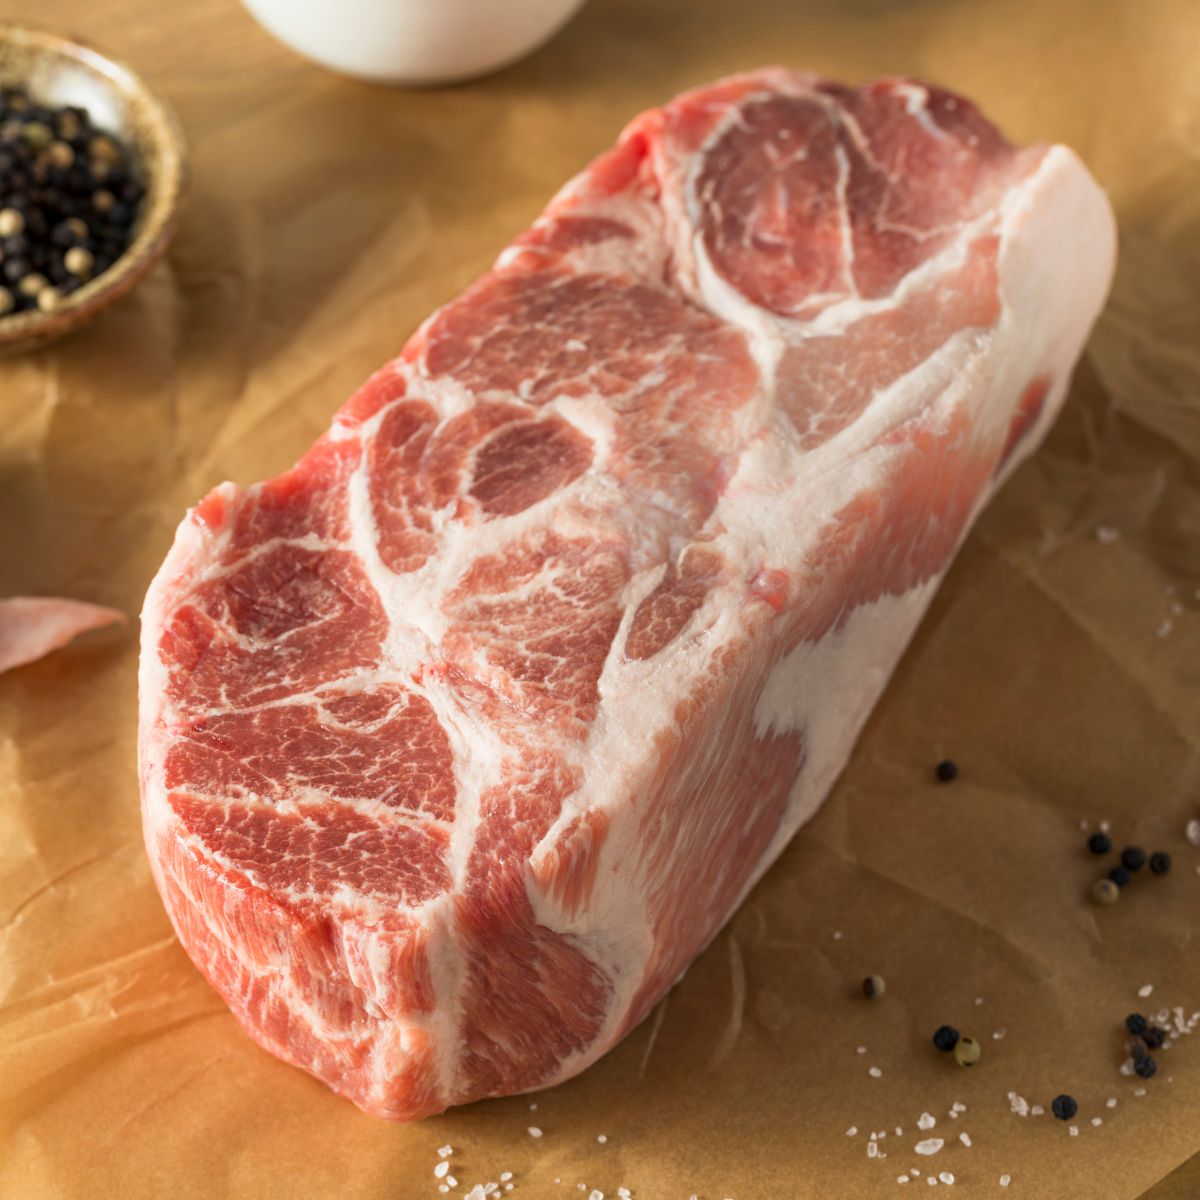
Pork kasim is pork shoulder, cut from the front of the pig. That is the answer most people are looking for, and for most recipes it is enough.
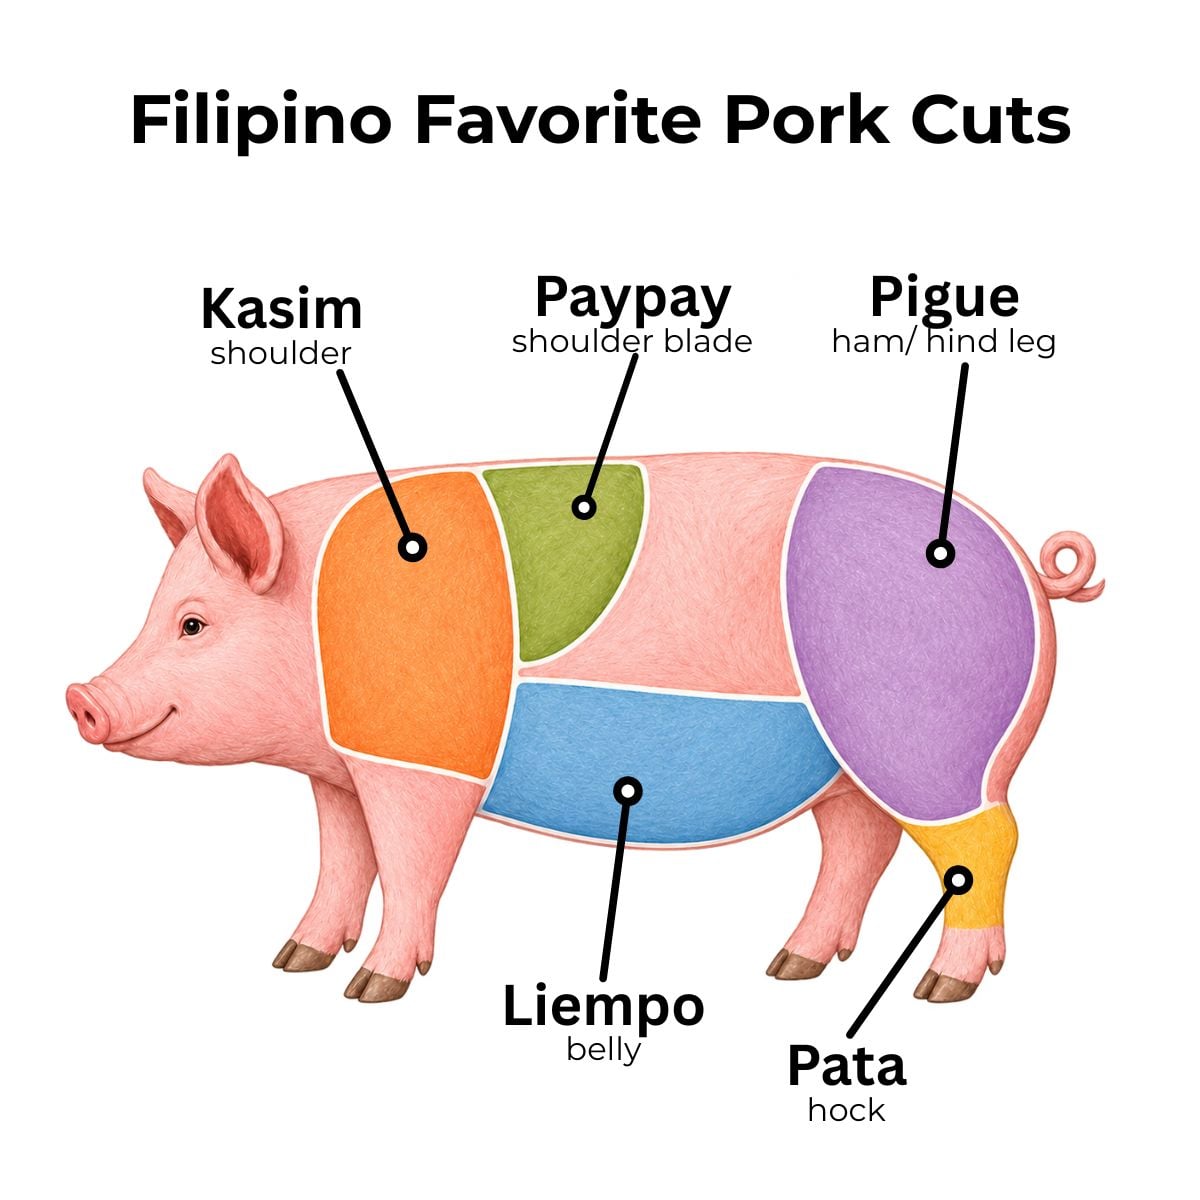
The longer version is that Philippine cut standards split the shoulder in two. Kasim is the front and lower portion, while paypay is the upper shoulder and blade. Which one you walk out of the store with depends on how your butcher cuts.
It is also a cut that shows up all over Filipino cooking: adobo, menudo, sinigang, and Filipino BBQ skewers. This guide covers the naming, what to look for at the counter, and the one temperature that decides whether kasim turns tender or stays tough.
Save This Recipe 💌
Jump to:
What Is Kasim in English?
Kasim is generally translated as pork shoulder. Under the more specific Filipino classification, kasim is the front and lower shoulder while paypay is the upper shoulder or blade. In US stores, either Boston butt or picnic shoulder will work for kasim recipes.
Walk into a US grocery store and pork shoulder can show up under several different labels:
- Pork butt or Boston butt. The upper shoulder, closer to the neck. This is what most recipes mean when they say pork shoulder.
- Picnic shoulder or picnic roast. The lower shoulder, running down toward the front leg. Leaner, a little tougher, more connective tissue.
- Shoulder roast or pork shoulder. Usually the butt, sometimes the whole primal, depending on the store.
At Filipino and Asian markets you may see labels such as pork shoulder, pork shoulder butt, or picnic shoulder. This is where the terminology gets confusing because Filipino and American cutting systems do not line up perfectly.
The word butt throws people off because Boston butt does not come from the pig's rear. It comes from the upper shoulder. The actual rear leg is pigue, which is a much leaner cut. One commonly repeated explanation for the name “Boston butt” is that shoulder meat was historically packed in barrels called butts, although the exact origin of the term is not completely settled.
What to actually ask for. If a Filipino recipe simply calls for kasim, ask for pork shoulder. If the butcher separates the shoulder into two cuts, picnic shoulder is the closer match to kasim, while Boston butt is closer to paypay. For adobo, menudo, sinigang, and other braised dishes, either shoulder cut can work well because both contain enough fat and connective tissue for slow cooking.
Kasim, Paypay, Pigue, Liempo and Pata: What's the Difference?
Kasim comes from the front/lower shoulder, closer to the front leg. It is a hardworking muscle, which is why it runs with fat, collagen, and litid, and why it needs time rather than high heat.
Here is how it stacks up against the cuts sold next to it:
| Cut | Where it comes from | Fat level | Best for |
|---|---|---|---|
| Kasim | Front/lower shoulder, closer to the front leg | Moderate | Adobo, menudo, sinigang, braising |
| Paypay | Upper shoulder/shoulder blade | Moderate to high, well marbled | Inihaw, BBQ, roasting, braising |
| Pigue | Rear leg/ham | Lean | Tocino, hamonado, pork steak, roasts |
| Liempo | Belly and sides | Highest, layered | Lechon kawali, inihaw, crispy dishes |
| Pata | Lower front or hind leg, including shank/hock and foot | Skin, tendon, collagen | Crispy pata, paksiw, pata tim |
The part that trips people up
There are two ways you will see the word kasim used.
In everyday Filipino cooking and at many markets, kasim is often used broadly to mean pork shoulder. But under the more specific Philippine cut classification, the shoulder is divided into kasim and paypay. Kasim is the front/lower shoulder, while paypay is the upper shoulder or shoulder-blade portion.
For home cooking, this distinction usually does not make or break a recipe. Both are flavorful shoulder cuts that work well for many Filipino dishes. It matters most when you are trying to match a specific butcher cut.
Which one to grab
For adobo, menudo, sinigang, and anything simmered, kasim. For grilling, paypay if your vendor separates it, kasim if not. For anything you want lean and holding its shape, pigue. For crisp and rich, liempo.
How to Pick a Good Kasim
The naming is sorted. Now the part that actually changes how dinner turns out.
Bone-in or boneless. Bone-in gives you more flavor on long cooks and helps the meat hold its shape while it simmers. It also means less usable meat per pound and more work breaking it down. Boneless is what I reach for on weeknights, since cubing it takes two minutes instead of ten. For a weekend roast or a big pot of sinigang, bone-in is worth the trade.
Skin-on or skinless. Only go skin-on if you are roasting and you want crackling. In a stew the skin turns soft and rubbery and most people end up picking it out. Worth correcting a common assumption here: kasim is sold boneless and skinless just as often as it is sold skin-on, especially at supermarkets and online butchers. You are not settling for the wrong thing by grabbing the skinless pack.
What good marbling looks like. You want fat threaded through the meat, not one thick slab sitting on top. A single fat cap renders off and leaves the muscle underneath dry, while marbling bastes from the inside as it cooks. The meat should be firm and pink without excessive liquid pooling in the package. Some purge is normal. If the surface is wet, pat it very dry before cooking so it browns instead of steaming.
How much to buy. Figure about half a pound per person for boneless, closer to three quarters for bone-in. Kasim also shrinks more than lean cuts do, since the fat renders out, so round up if you want leftovers. It reheats better than most pork anyway.
Buying Kasim at the Palengke
You will rarely see the word kasim on a sign. Philippine markets and supermarkets label meat by the dish it is headed for, so the case reads adobo cut, menudo cut, sinigang cut, or giniling instead of naming the part of the pig.
That is more useful than it sounds once you know the code. Most adobo cut and menudo cut pork is shoulder, just chopped to different sizes. Adobo cut runs bigger, roughly two-inch chunks. Menudo cut is smaller dice. If you want the whole piece to break down yourself, ask for kasim by name and the vendor will know exactly what you mean.
How to Cook Kasim
There is no single right method. What changes is how long you commit, and whether you are breaking the collagen down or cooking fast enough that it never matters.
The full temperature explanation comes in the next section, but the short version is worth having in front of you: for anything you want tender and shreddable, kasim needs to go well past the point where pork is merely safe to eat.
Braising or Stewing
The default for kasim and the reason the cut exists in Filipino cooking. Cubed into two-inch pieces and simmered gently, the fat and collagen melt into the sauce and the meat pulls apart with a spoon.
Plan on 1.5 to 2 hours at a bare simmer, not a rolling boil. Hard boiling squeezes the muscle fibers tight and drives out moisture before the collagen has had time to soften, which is how you end up with pork that is somehow both overcooked and tough.
One recipe to try is Pork Guisantes recipe, a pork and green peas stew that is hearty and family-approved.
Roasting
For a whole kasim with a crisp outside and meat that shreds. Roast at 300°F to 325°F, figuring roughly 45 minutes per pound, then finish with 15 to 20 minutes at 450°F to crisp the outside.
Season it the night before if you can. Salt needs time to work past the surface, and on a piece this thick a last-minute seasoning only flavors the outer half inch.
Grilling or Inihaw
Grilled kasim is hard to beat, especially cut into chunks or strips for skewers. The fat keeps it juicy while the grill gives you smoky, charred edges.
Cut it into half-inch strips or one-inch cubes so it cooks through in 3 to 4 minutes a side over medium-high heat. Thicker than that and the outside chars before the middle is done. This is the one case where the marinade is doing real work, since a soy and calamansi base tenderizes while it flavors.
I talk more about that in my Filipino Street Food guide, where pork kasim is the star of those Pinoy BBQ skewers.
Quick Sear
No time, no problem. This method works on completely different logic from the rest of the page.
Sliced thin against the grain, quarter-inch or less, kasim cooks in 2 to 3 minutes in a hot pan. You are not breaking down collagen here, you are cooking fast enough that the muscle fibers never get a chance to seize. Slicing against the grain does the tenderizing that time would otherwise do. Get the pan properly hot and do not crowd it, or the pork steams instead of searing.
Check out my Pork Steak (Pinoy Bistek) recipe. It uses thin-sliced kasim in a soy-calamansi sauce and it is easy to make.
Coconut Stews (Ginataan Style)
Same slow logic as braising, with one thing to watch. Coconut milk splits if you boil it hard, so keep it at a gentle simmer and add the thicker coconut cream toward the end rather than at the start.
About 1.5 hours for cubed kasim. Try Spicy Pork with Coconut Milk, which is bold, rich, and exactly what this cut was made for.
Pressure Cooking
The shortcut when you want braised results on a weeknight. Cubed kasim runs 25 to 30 minutes at high pressure, a whole roast closer to 60 to 75 minutes, both with a natural release.
Let the pressure release naturally when you can. Natural release works especially well for pork shoulder and other braised meats because it gives the meat additional time to finish cooking gently before you open the pot.
What Temperature Should Pork Kasim Be Cooked To?
This is the part almost nobody explains, and it is the reason most people end up with tough kasim.
Pork is safe to eat at 145°F with a three-minute rest. That is the USDA number and it is the right target for lean cuts like loin or chops.
For a whole piece of kasim or chunks you want tender and fall-apart, 145°F is safe but too low for the connective tissue to fully soften. At that point, the meat can still be chewy even though it is safe to eat.
Why the safe temperature is the wrong target
Kasim is a hardworking muscle laced with collagen, the connective tissue you see as litid. Collagen does not soften at 145°F. It stays tight and rubbery, and it squeezes the muscle fibers around it.
Somewhere around 160°F to 170°F it starts breaking down into gelatin, and that process needs time as well as heat. As it converts, it coats the meat fibers and gives you that silky, falls-apart texture. That is the whole point of this cut.
For fall-apart or shreddable kasim, aim for about 195°F to 205°F.
That sounds alarmingly high if you are used to cooking chops. It is not the same situation. You are not trying to avoid overcooking the muscle, you are trying to cook it long enough for the connective tissue to give up.
The tough middle stretch
Here is what trips people up: kasim can feel tougher before it becomes tender.
As the meat heats up, the muscle fibers tighten before enough collagen has broken down into gelatin. At this stage the pork may seem done because it has reached a safe temperature, but the texture can still be chewy.
Keep cooking it gently. Given enough time, more of that connective tissue softens and the meat becomes tender.
The exception
Thin-sliced kasim for stir-fry or bistek does not follow any of this. You are cooking it in 2 to 3 minutes, well before collagen becomes a factor, and slicing against the grain does the tenderizing instead. Cook those to done and stop.
Quick reference
| What you're making | Target internal temp |
|---|---|
| Braised or stewed cubes | 195°F to 205°F |
| Whole roast, shreddable | 200°F to 205°F |
| Roast you want to slice, not shred | 180°F to 185°F |
| Grilled strips or skewers | Cooked through, 145°F + 3-minute rest |
| Thin-sliced stir-fry | Cooked through, 145°F + 3-minute rest |
A cheap instant-read thermometer settles all of this in five seconds. On a cut this forgiving it is the one piece of equipment that actually changes the result.
Storage, Freezing, and Meal Prep
Kasim is one of the better cuts for cooking ahead, mostly because the things that make it slow to cook also make it hold up well afterward.
Fridge. Cooked kasim keeps 3 to 4 days in a sealed container. Store it in its sauce if you have any. The liquid keeps the surface from drying out and the meat keeps absorbing flavor while it sits.
Freezer. Raw or cooked portions freeze well for up to 3 months. Freeze it in sauce or broth if you can, since the liquid protects the meat from freezer burn far better than a bag on its own. Portion it before freezing rather than after, so you are not chiseling apart a solid block on a Tuesday.
Reheating. Add a splash of broth or water before warming it through. Gelatin firms up when it chills, which is why leftover kasim looks set in the container, and a little liquid plus gentle heat loosens it back to where it was. Reheat low and slow. High heat tightens the fibers you spent hours relaxing.
Why leftovers are better
Kasim genuinely improves overnight. As it cools, the rendered fat and gelatin redistribute through the meat instead of sitting in the sauce, and the seasoning has time to move past the surface. Adobo, humba, and menudo all follow this pattern, which is why so many Filipino braises are cooked the day before.
Worth planning around rather than treating as a bonus. If you are cooking kasim for a gathering, make it a day ahead and reheat.
Common FAQs
Kasim is generally translated as pork shoulder. More specifically, under the Filipino pork-cut classification, kasim is the front/lower shoulder, while paypay is the upper shoulder or shoulder-blade portion. In US stores, picnic shoulder is the closer equivalent to kasim.
Kasim comes from the front/lower shoulder, closer to the front leg. It is a hardworking area with fat, collagen, and litid running through the meat.
Not exactly. Kasim is generally understood as pork shoulder, but under the more specific Filipino cut classification, kasim is the front/lower shoulder while pork butt or Boston butt is closer to paypay, the upper shoulder. In everyday cooking, however, either shoulder cut can often be used successfully in recipes calling for kasim.
Kasim is the front shoulder and pigue is the rear leg. Kasim has more fat and collagen, which makes it better for adobo, menudo, sinigang, and anything simmered. Pigue is leaner and firmer, so it suits tocino, hamonado, and dishes where you want the meat to hold its shape.
Yes, and it will be richer. Liempo is pork belly, so it has more fat and less connective tissue. It cooks faster and gives you a fattier sauce. If you want that, go ahead. If you want meat that shreds, stay with kasim.
Not for slow cooking. Loin is lean with almost no collagen, so long simmering dries it out rather than tenderizing it.If loin is what you have, cook it quickly to 145°F and let it rest for 3 minutes.
145°F followed by a 3-minute rest is the safety minimum for whole cuts of pork, but a whole piece of kasim meant for braising or shredding will still be chewy at that temperature. For anything you want tender and shreddable, take it to 195°F to 205°F so the collagen has time to break down. Thin-sliced kasim for stir-fry is the exception and only needs to be cooked through.
Usually one of two things. Either it has not gone far enough, since kasim gets tougher around 160°F to 170°F before it turns tender, or it was boiled instead of simmered. Hard boiling tightens the muscle fibers faster than the collagen can soften. Keep it at a bare simmer and give it more time.
About half a pound boneless, or three quarters of a pound bone-in. It shrinks more than lean cuts as the fat renders, so round up if you want leftovers.
Want More Pork Recipes?
- Pork Steak (Pinoy Bistek)- thin-sliced kasim in a soy-calamansi sauce, about 40 minutes
- Humba- braised low and slow until the pork shreds
- Pork and Green Peas (Filipino Guisantes)- a simple pork and green peas stew
- Spicy Pork with Coconut Milk - ginataan style, rich and a little hot

Cooking with kasim this week?
Tell me what you are making in the comment box below, and if this guide helped, share it on Facebook, Pinterest & Instagram.
Thank you!