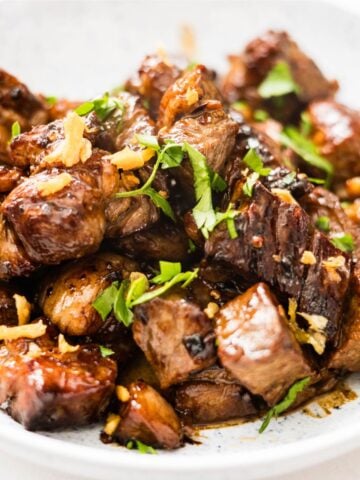
Beef Pares is Filipino comfort food at its best - tender braised beef in a sweet-savory sauce, served with garlic fried rice and clear soup. The whole thing comes together in one pot, and you get a complete meal that's been a Manila street food staple for decades.
The name "pares" means "pair" in Tagalog because the beef is always paired with rice and soup - it's a three-part meal that started at Manila's roadside eateries in the 1970s. The beef gets so tender it falls apart, the sauce is rich and slightly sweet, and the garlic rice soaks up all that flavor. Make it once and you'll understand why there are specialty pares houses all over the Philippines.

Save This Recipe 💌
Jump to:
- Why You'll Love It
- What is Beef Pares?
- Ingredients
- Substitutions and Additions
- How to Make Beef Pares
- Rose's Top Tips
- Variations
- What To Serve With This
- Storage and Freezing Instruction
- Time-Saving Tips
- Troubleshooting & FAQs
- More Filipino Beef Favorites
- Did you try this recipe?
- Beef Pares (Tender Filipino Braised Beef)
Why You'll Love It
- Complete meal in one - Beef, rice, and soup all come together. No need to cook multiple side dishes.
- Fall-apart tender beef - Braised low and slow (or pressure cooked fast) until it melts in your mouth
- Sweet-savory perfection - The sauce hits that Filipino sweet-salty balance that's so satisfying
- Street food classic - Authentic Manila roadside eatery experience at home
- Freezer-friendly - Make a big batch, freeze portions, pull out whenever you want
- Pressure cooker option - 30-40 minutes in an Instant Pot vs 2 hours on the stove
- Budget-friendly - Uses affordable beef cuts (brisket, chuck, short ribs) that become incredibly tender
What is Beef Pares?
Beef pares is a Filipino comfort-food favorite built around melt-in-your-mouth braised beef in a rich, slightly sweet, soy-based sauce scented with star anise. It started as an affordable way to make tougher cuts taste crave-worthy, and it’s now such a staple that you’ll find dedicated pares spots serving it all over the Philippines.
Ingredients


- Beef (chuck, brisket, or short ribs): Opt for marbled cuts for melt-in-your-mouth tenderness.
- Onion: Adds a touch of sweetness and depth to the dish.
- Garlic: Essential for a savory, aromatic base.
- Ginger: Provides warmth and a slight peppery flavor to balance the richness.
- Star Anise: Infuses the broth with a subtle, sweet licorice aroma.
- Cinnamon Stick: Adds a mild warmth and spice
- Beef Bouillon or Powder: Enhances the rich beefy flavor of the broth.
- Bay Leaf: Adds an earthy, slightly floral note to the dish.
- Soy Sauce: A savory base that adds depth and umami flavor.
- Oyster Sauce: Enhances the savory profile with a touch of sweetness and umami.
- Brown Sugar: Balances the salty and savory flavors with a hint of sweetness.
- Pepper: Adds a mild spice to round out the dish.
- Beef Stock: Forms the rich broth.
- Sesame Oil: Adds a nutty aroma and flavor as a finishing touch.
- Oil for Sautéing: Helps cook and soften the aromatics.
- Cornstarch: Used to make a slurry for thickening the sauce.
See recipe card for quantities.
Substitutions and Additions
- Sweetness: Adjust the sweetness by using honey or white sugar instead of brown sugar.
- Spice: Want a spicy kick? Add a dash of chili flakes or fresh chili.
How to Make Beef Pares

- Pre-soften the Beef (Optional): If using an Instant Pot, add the meat and enough water to cover. Cook on high pressure for 30-40 minutes until the beef is tender. Set aside the broth and beef. Skip this step if you prefer to cook on the stovetop.

- Sauté the Aromatics: Heat oil in a large pot over medium heat. Add the onion, garlic, and ginger, sautéing until fragrant and softened.

- Add Beef and Spices: Toss in the pre-softened beef (or raw) if cooking on the stovetop) and season with soy sauce, oyster sauce, star anise, cinnamon stick, bay leaf, and bouillon. Stir well to coat the beef with the spices.

- Simmer: Pour in stock (you used to pressure cook the meat) and bring the mixture to a simmer. If cooking raw, add water (enough to cover the meast and simmer for 1-2 hours until the meat is tender. If pre-softened, simmer for about 20 minutes to allow the flavors to meld.
- Make Cornstarch Slurry for Thickening: In a small bowl, mix 1 tablespoon of cornstarch with 2 tablespoons of water to form a slurry. Stir it into the mixture and continue to simmer until the sauce thickens.
- Adjust the Flavor: Stir in brown sugar and season with pepper to taste. Adjust saltiness by adding more soy sauce or sugar to balance the sweetness.
- Finish with Sesame Oil: Stir in sesame oil for a nutty finish, then remove the star anise, cinnamon stick, and bay leaf.
- Serve: Serve over hot rice and garnish with chopped green onions for a delicious, aromatic meal.
Rose's Top Tips
- Blanch the beef first - Don't skip the 10-15 minute soak and rinse. This removes blood and impurities, giving you a crystal-clear broth instead of a murky, scummy one.
- Sear the beef (optional upgrade) - After blanching, pat the beef dry and sear it in a hot pan until browned on all sides before boiling. This adds deeper flavor and better color to the final dish.
- Simmer gently, don't boil - Once the beef is simmering, keep it at a gentle bubble. A rolling boil agitates the fat and protein, creating a cloudy, greasy broth. Low and slow wins.
- Use day-old rice for sinangag - Fresh hot rice gets mushy when fried. Cold, day-old rice has dried out slightly, so the grains stay separate and get crispy.
- Cool the broth to remove fat - Let the broth cool slightly and skim off the solidified fat from the surface. This makes both the soup and sauce less greasy. Refrigerate for 15-20 minutes if you want the fat to solidify completely for easier removal.
- Pressure cooker shortcut - Cook the beef in an Instant Pot or pressure cooker for 30-40 minutes on high pressure instead of 2 hours on the stovetop. Let it natural release for 10-15 minutes. Cuts cooking time by 75%.
- Make ahead and freeze - Beef pares freezes beautifully. Make a big batch, portion it out, and freeze for up to 3 months. Thaw in the fridge overnight and reheat. The flavors actually get better after a day or two.
Variations
- Spicy: Add chili flakes or fresh chili for a fiery twist, perfect for those who enjoy a spicy kick.
- Mami: Serve your pares with noodles in a flavorful broth for a comforting noodle soup variation.
- Sweet and Savory: Increase the brown sugar for a sweeter profile, balancing out the soy sauce’s saltiness even more.
- Tapa Style: Slice the beef thinner and cook it in the same sauce, serving it tapa-style with fried rice and egg.
- Garlic-Loaded: Sauté extra garlic and mix it into the dish for an even more aromatic and savory flavor.
- Vegetarian Pares: Swap for tofu or mushrooms, using the same savory-sweet sauce for a plant-based option.
- Crispy Pares: Fry the braised chunks after simmering to create crispy bites with a tender inside.
What To Serve With This
Beef Pares is traditionally served with garlic fried rice (sinangag) and a side of clear broth for dipping, creating a delightful combination of flavors. You can also pair it with the following:
- Steamed Rice: Plain steamed rice is a simple and classic accompaniment that complements the savory-sweet flavors of Pares.
- Fried Egg: A sunny-side-up or over-easy fried egg is a common addition, and the runny yolk can add a luscious richness to the dish.
- Pickled Vegetables: Sliced pickled vegetables, often called "atchara" in Filipino cuisine, provide a tangy and crunchy contrast to the rich beef.
- Chili Sauce: A bit of spicy chili sauce or vinegar-based dipping sauce can add a zesty kick to the meal.
- Sliced Scallions: Garnish with freshly sliced scallions or green onions for a burst of freshness and color.
- Fried Garlic: Top with crispy fried garlic for an extra layer of flavor and texture.
- Noodles: Boil noodles according to instruction and top it with beef pares. I used a store bought Trader Joes Squiggly noodles here.

Feel free to mix and match these accompaniments to suit your preferences.
Storage and Freezing Instruction
Storing is simple, making it perfect for meal prep or easy leftovers. Just let it cool, then transfer to an airtight container.
For freezing, divide into portions and place in freezer-safe bags or containers. This can be frozen for up to three months. To reheat, thaw in the fridge overnight and warm on the stovetop.
Time-Saving Tips
Using an Instant Pot or pressure cooker to cook the beef is a great time-saving technique. Lock the Instant Pot lid and pressure cook the meat for 20-30 minutes, adjusting for chunk size. After cooking, allow natural pressure release for 10-15 minutes and do a quick release if necessary.

As the beef cools, fat will solidify on the surface, simplifying fat removal. Skim off the fat with a spoon, or refrigerate it briefly to solidify the fat more for easier removal. Removing the solidified fat ensures that your Pares is flavorful without excess grease.

Troubleshooting & FAQs
Cloudy broth usually means the beef wasn’t blanched or rinsed first, or the pot was boiled too hard which stirs fat and impurities into the liquid. Keep it at a gentle simmer and skim the foam early, and if it’s already cloudy you can strain it through a fine mesh strainer or cheesecloth to clean it up.
It just needs more time or a better cut. Use brisket, chuck, or shank and keep it at a low simmer until it’s fork-tender, adding a splash of water if the pot gets dry.
Yes, stovetop works great, it just takes longer. Simmer covered for about 1½ to 2 hours (or until tender), then proceed with the sauce.
Star anise is the signature aroma, but you can still make a tasty pares without it. Use a small pinch of Chinese five spice (start with ¼ teaspoon and adjust) or simply skip it and lean on garlic, onion, and soy for flavor.
Yes, and it honestly tastes better the next day because the sauce soaks into the beef. Make the beef and sauce 1 to 2 days ahead, refrigerate, then reheat gently and cook the garlic rice fresh when serving.
Poke the beef with a fork, it should shred or pull apart easily with almost no resistance. If it still feels tight or chewy, keep cooking and check again in 15 to 20 minutes.
Either there’s too much broth, or it hasn’t reduced enough. Simmer uncovered until it thickens, and if you want it faster stir in a cornstarch slurry (1 tablespoon cornstarch + 2 tablespoons water) while gently bubbling.


Did you try this recipe?
Share how it turned out in the comment box below, and if you loved it, share it on Facebook, Pinterest & Instagram.
Thank you!


Beef Pares (Tender Filipino Braised Beef)
Equipment
- 1 dutch oven or large pot
Ingredients
- 2½ lb Beef (usually a cut like chuck, brisket, or short ribs) cubed
- 1 large onion, chopped
- 1 head garlic, minced
- 2 thumb-sized ginger, sliced
- 5 cups beef stock you used to soften meat
- 4 pcs star anise
- 1 pc cinnamon stick or ½ teaspoon poweder
- 1 pc beef bouillon or 1 teaspoon beef powder
- 2 pcs bay leaves
- 2 tablespoon oyster sauce
- ½ cup soy sauce
- ½ cup brown sugar
- 1 teaspoon pepper
- 1 teaspoon sesame oil
- 2 tablespoon oil for sauteing
- 1 tablespoon cornstarch with 2 tablespoon of water
- 8 cups water add more as needed. It should be enough to cover the meat as it soften/ simmer.
Instructions
- Pre-soften the Beef (Optional): If using an Instant Pot, add the beef and enough water to cover. Cook on high pressure for 30-40 minutes until the beef is tender. Set aside the broth and beef. Skip this step if you prefer to cook on the stovetop.2½ lb Beef (usually a cut like chuck, brisket, or short ribs), 8 cups water
- Sauté the Aromatics: Heat oil in a large pot over medium heat. Add the onion, garlic, and ginger, sautéing until fragrant and softened.1 large onion, chopped, 1 head garlic, minced, 2 tablespoon oil for sauteing, 2 thumb-sized ginger, sliced
- Add Beef and Spices: Toss in the pre-softened beef (or raw beef if cooking on the stovetop) and season with soy sauce, oyster sauce, star anise, cinnamon stick, bay leaf, and beef bouillon. Stir well to coat the beef with the spices.2½ lb Beef (usually a cut like chuck, brisket, or short ribs), 4 pcs star anise, 1 pc cinnamon stick or ½ teaspoon poweder, 1 pc beef bouillon or 1 teaspoon beef powder, 2 pcs bay leaves, ½ cup soy sauce, 2 tablespoon oyster sauce
- Simmer: Pour in beef stock and bring the mixture to a simmer. If cooking raw beef, simmer for 1-2 hours until the beef is tender. If pre-softened, simmer for about 20 minutes to allow the flavors to meld.5 cups beef stock you used to soften meat
- Make Cornstarch Slurry for Thickening: In a small bowl, mix 1 tablespoon of cornstarch with 2 tablespoons of water to form a slurry. Stir it into the beef mixture and continue to simmer until the sauce thickens.1 tablespoon cornstarch
- Adjust the Flavor: Stir in brown sugar and season with pepper to taste. Adjust saltiness by adding more soy sauce or sugar to balance the sweetness.½ cup brown sugar, 1 teaspoon pepper
- Finish with Sesame Oil: Stir in sesame oil for a nutty finish, then remove the star anise, cinnamon stick, and bay leaf.1 teaspoon sesame oil
- Serve: Serve the beef over hot rice and garnish with chopped green onions for a delicious, aromatic meal.
Save This Recipe 💌
Notes
- Pre-soften the beef in an Instant Pot (30–40 min on high pressure) to cut stovetop time significantly. Let it natural release for 10–15 minutes.
- After cooking, let the beef cool so the fat solidifies on the surface — then skim it off easily with a spoon. This keeps the broth clean and not greasy.
- Simmer gently, don't boil. A rolling boil makes the broth cloudy and greasy. Low and slow wins.
- If the sauce is too thin, stir in a cornstarch slurry while it's gently bubbling.
- Blanch/rinse the beef first to remove impurities and keep the broth clear.
- Remove star anise, cinnamon stick, and bay leaves before serving.
- Tastes even better the next day — great for making ahead.
- Freezes well for up to 3 months. Thaw overnight in the fridge and reheat on the stovetop.
- Serve with garlic fried rice (sinangag), a fried egg, and a side of the clear broth — the classic "pares" trio.
- For the garlic rice, use day-old cold rice so the grains stay separate and get crispy.